A gentle introduction to Linux Kernel fuzzing
This article was first published on Cloudflare blog:
For some time I’ve wanted to play with coverage-guided fuzzing. Fuzzing is a powerful testing technique where an automated program feeds semi-random inputs to a tested program. The intention is to find such inputs that trigger bugs. Fuzzing is especially useful in finding memory corruption bugs in C or C++ programs.
Normally it's recommended to pick a well known, but little explored, library that is heavy on parsing. Historically things like libjpeg, libpng and libyaml were perfect targets. Nowadays it's harder to find a good target - everything seems to have been fuzzed to death already. That's a good thing! I guess the software is getting better! Instead of choosing a userspace target I decided to have a go at the Linux Kernel netlink machinery.
Netlink is an internal Linux facility used by tools like "ss", "ip", "netstat". It's used for low level networking tasks - configuring network interfaces, IP addresses, routing tables and such. It's a good target: it's an obscure part of kernel, and it's relatively easy to automatically craft valid messages. Most importantly, we can learn a lot about Linux internals in the process. Bugs in netlink aren't going to have security impact though - netlink sockets usually require privileged access anyway.
In this post we'll run AFL fuzzer, driving our netlink shim program against a custom Linux kernel. All of this running inside KVM virtualization.
This blog post is a tutorial. With the easy to follow instructions, you should be able to quickly replicate the results. All you need is a machine running Linux and 20 minutes.
Prior work
The technique we are going to use is formally called "coverage-guided fuzzing". There's a lot of prior literature:
- The Smart Fuzzer Revolution by Dan Guido, and LWN article about it
- Effective file format fuzzing by Mateusz “j00ru” Jurczyk
- honggfuzz by Robert Swiecki, is a modern, feature-rich coverage-guided fuzzer
- ClusterFuzz
- Fuzzer Test Suite
Many people have fuzzed the Linux Kernel in the past. Most importantly:
- syzkaller (aka syzbot) by Dmitry Vyukov, is a very powerful CI-style continuously running kernel fuzzer, which found hundreds of issues already. It's an awesome machine - it will even report the bugs automatically!
- Trinity fuzzer
We'll use the AFL, everyone's favorite fuzzer. AFL was written by Michał Zalewski. It's well known for its ease of use, speed and very good mutation logic. It's a perfect choice for people starting their journey into fuzzing!
If you want to read more about AFL, the documentation is in couple of files:
Coverage-guided fuzzing
Coverage-guided fuzzing works on the principle of a feedback loop:
- the fuzzer picks the most promising test case
- the fuzzer mutates the test into a large number of new test cases
- the target code runs the mutated test cases, and reports back code coverage
- the fuzzer computes a score from the reported coverage, and uses it to prioritize the interesting mutated tests and remove the redundant ones
For example, let's say the input test is "hello". Fuzzer may mutate it to a number of tests, for example: "hEllo" (bit flip), "hXello" (byte insertion), "hllo" (byte deletion). If any of these tests will yield an interesting code coverage, then it will be prioritized and used as a base for a next generation of tests.
Specifics on how mutations are done, and how to efficiently compare code coverage reports of thousands of program runs is the fuzzer secret sauce. Read on the AFL's technical whitepaper for nitty gritty details.
The code coverage reported back from the binary is very important. It allows fuzzer to order the test cases, and identify the most promising ones. Without the code coverage the fuzzer is blind.
Normally, when using AFL, we are required to instrument the target code so that coverage is reported in an AFL-compatible way. But we want to fuzz the kernel! We can't just recompile it with "afl-gcc"! Instead we'll use a trick. We'll prepare a binary that will trick AFL into thinking it was compiled with its tooling. This binary will report back the code coverage extracted from kernel.
Kernel code coverage
The kernel has at least two built-in coverage mechanisms - GCOV and KCOV:
KCOV was designed with fuzzing in mind, so we'll use this.
Using KCOV is pretty easy. We must compile the Linux kernel with the right setting. First, enable the KCOV kernel config option:
cd linux
./scripts/config \
    -e KCOV \
    -d KCOV_INSTRUMENT_ALL
KCOV is capable of recording code coverage from the whole kernel. It can be set with KCOV_INSTRUMENT_ALL option. This has disadvantages though - it would slow down the parts of the kernel we don't want to profile, and would introduce noise in our measurements (reduce "stability"). For starters, let's disable KCOV_INSTRUMENT_ALL and enable KCOV selectively on the code we actually want to profile. Today, we focus on netlink machinery, so let's enable KCOV on whole "net" directory tree:
find net -name Makefile | xargs -L1 -I {} bash -c 'echo "KCOV_INSTRUMENT := y" >> {}'
In a perfect world we would enable KCOV only for a couple of files we really are interested in. But netlink handling is peppered all over the network stack code, and we don't have time for fine tuning it today.
With KCOV in place, it's worth to add "kernel hacking" toggles that will increase the likelihood of reporting memory corruption bugs. See the README for the list of Syzkaller suggested options - most importantly KASAN.
With that set we can compile our KCOV and KASAN enabled kernel. Oh, one more thing. We are going to run the kernel in a kvm. We're going to use "virtme", so we need a couple of toggles:
./scripts/config \
    -e VIRTIO -e VIRTIO_PCI -e NET_9P -e NET_9P_VIRTIO -e 9P_FS \
    -e VIRTIO_NET -e VIRTIO_CONSOLE  -e DEVTMPFS ...
(see the README for full list)
How to use KCOV
KCOV is super easy to use. First, note the code coverage is recorded in a per-process data structure. This means you have to enable and disable KCOV within a userspace process, and it's impossible to record coverage for non-task things, like interrupt handling. This is totally fine for our needs.
KCOV reports data into a ring buffer. Setting it up is pretty simple, see our code. Then you can enable and disable it with a trivial ioctl:
ioctl(kcov_fd, KCOV_ENABLE, KCOV_TRACE_PC);
/* profiled code */
ioctl(kcov_fd, KCOV_DISABLE, 0);
After this sequence the ring buffer contains the list of %rip values of all the basic blocks of the KCOV-enabled kernel code. To read the buffer just run:
n = __atomic_load_n(&kcov_ring[0], __ATOMIC_RELAXED);
for (i = 0; i < n; i++) {
    printf("0x%lx\n", kcov_ring[i + 1]);
}
With tools like addr2line it's possible to resolve the %rip to a specific line of code. We won't need it though - the raw %rip values are sufficient for us.
Feeding KCOV into AFL
The next step in our journey is to learn how to trick AFL. Remember, AFL needs a specially-crafted executable, but we want to feed in the kernel code coverage. First we need to understand how AFL works.
AFL sets up an array of 64K 8-bit numbers. This memory region is called "shared_mem" or "trace_bits" and is shared with the traced program. Every byte in the array can be thought of as a hit counter for a particular (branch_src, branch_dst) pair in the instrumented code.
It's important to notice that AFL prefers random branch labels, rather than reusing the %rip value to identify the basic blocks. This is to increase entropy - we want our hit counters in the array to be uniformly distributed. The algorithm AFL uses is:
cur_location = <COMPILE_TIME_RANDOM>;
shared_mem[cur_location ^ prev_location]++;
prev_location = cur_location >> 1;
In our case with KCOV we don't have compile-time-random values for each branch. Instead we'll use a hash function to generate a uniform 16 bit number from %rip recorded by KCOV. This is how to feed a KCOV report into the AFL "shared_mem" array:
n = __atomic_load_n(&kcov_ring[0], __ATOMIC_RELAXED);
uint16_t prev_location = 0;
for (i = 0; i < n; i++) {
        uint16_t cur_location = hash_function(kcov_ring[i + 1]);
        shared_mem[cur_location ^ prev_location]++;
        prev_location = cur_location >> 1;
}
Reading test data from AFL
Finally, we need to actually write the test code hammering the kernel netlink interface! First we need to read input data from AFL. By default AFL sends a test case to stdin:
/* read AFL test data */
char buf[512*1024];
int buf_len = read(0, buf, sizeof(buf));
Fuzzing netlink
Then we need to send this buffer into a netlink socket. But we know nothing about how netlink works! Okay, let's use the first 5 bytes of input as the netlink protocol and group id fields. This will allow the AFL to figure out and guess the correct values of these fields. The code testing netlink (simplified):
netlink_fd = socket(AF_NETLINK, SOCK_RAW | SOCK_NONBLOCK, buf[0]);

struct sockaddr_nl sa = {
        .nl_family = AF_NETLINK,
        .nl_groups = (buf[1] <<24) | (buf[2]<<16) | (buf[3]<<8) | buf[4],
};

bind(netlink_fd, (struct sockaddr *) &sa, sizeof(sa));

struct iovec iov = { &buf[5], buf_len - 5 };
struct sockaddr_nl sax = {
      .nl_family = AF_NETLINK,
};

struct msghdr msg = { &sax, sizeof(sax), &iov, 1, NULL, 0, 0 };
r = sendmsg(netlink_fd, &msg, 0);
if (r != -1) {
      /* sendmsg succeeded! great I guess... */
}
That's basically it! For speed, we will wrap this in a short loop that mimics the AFL "fork server" logic. I'll skip the explanation here, see our code for details. The resulting code of our AFL-to-KCOV shim looks like:
forksrv_welcome();
while(1) {
    forksrv_cycle();
    test_data = afl_read_input();
    kcov_enable();
    /* netlink magic */
    kcov_disable();
    /* fill in shared_map with tuples recorded by kcov */
    if (new_crash_in_dmesg) {
         forksrv_status(1);
    } else {
         forksrv_status(0);
    }
}
How to run the custom kernel
We're missing one important piece - how to actually run the custom kernel we've built. There are three options:
"native": You can totally boot the built kernel on your server and fuzz it natively. This is the fastest technique, but pretty problematic. If the fuzzing succeeds in finding a bug you will crash the machine, potentially losing the test data. Cutting the branches we sit on should be avoided.
"uml": We could configure the kernel to run as User Mode Linux. Running a UML kernel requires no privileges. The kernel just runs a user space process. UML is pretty cool, but sadly, it doesn't support KASAN, therefore the chances of finding a memory corruption bug are reduced. Finally, UML is a pretty magic special environment - bugs found in UML may not be relevant on real environments. Interestingly, UML is used by Android network_tests framework.
"kvm": we can use kvm to run our custom kernel in a virtualized environment. This is what we'll do.
One of the simplest ways to run a custom kernel in a KVM environment is to use "virtme" scripts. With them we can avoid having to create a dedicated disk image or partition, and just share the host file system. This is how we can run our code:
virtme-run \
    --kimg bzImage \
    --rw --pwd --memory 512M \
    --script-sh "<what to run inside kvm>"
But hold on. We forgot about preparing input corpus data for our fuzzer!
Building the input corpus
Every fuzzer takes a carefully crafted test cases as input, to bootstrap the first mutations. The test cases should be short, and cover as large part of code as possible. Sadly - I know nothing about netlink. How about we don't prepare the input corpus...
Instead we can ask AFL to "figure out" what inputs make sense. This is what Michał did back in 2014 with JPEGs and it worked for him. With this in mind, here is our input corpus:
mkdir inp
echo "hello world" > inp/01.txt
Instructions, how to compile and run the whole thing are in README.md on our github. It boils down to:
virtme-run \
    --kimg bzImage \
    --rw --pwd --memory 512M \
    --script-sh "./afl-fuzz -i inp -o out -- fuzznetlink"
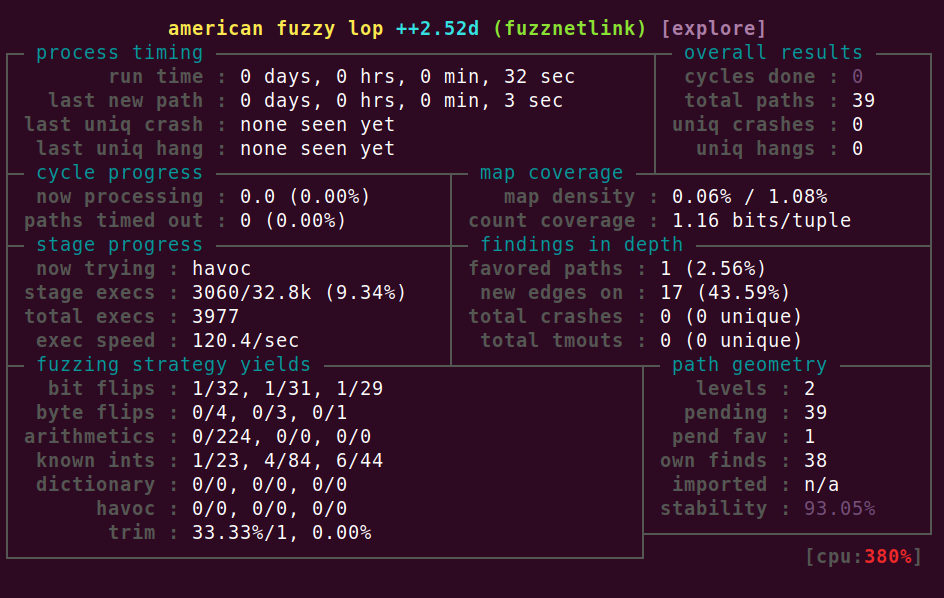
With this running you will see the familiar AFL status screen:
Further notes
That's it. Now you have a custom hardened kernel, running a basic coverage-guided fuzzer. All inside KVM.
Was it worth the effort? Even with this basic fuzzer, and no input corpus, after a day or two the fuzzer found an interesting code path: NEIGH: BUG, double timer add, state is 8. With a more specialized fuzzer, some work on improving the "stability" metric and a decent input corpus, we could expect even better results.
If you want to learn more about what netlink sockets actually do, see a blog post by my colleague Jakub Sitnicki Multipath Routing in Linux - part 1. Then there is a good chapter about it in Linux Kernel Networking book by Rami Rosen.
In this blog post we haven't mentioned:
- details of AFL shared_memory setup
- implementation of AFL persistent mode
- how to create a network namespace to isolate the effects of weird netlink commands, and improve the "stability" AFL score
- technique on how to read dmesg (/dev/kmsg) to find kernel crashes
- idea to run AFL outside of KVM, for speed and stability - currently the tests aren't stable after a crash is found
But we achieved our goal - we set up a basic, yet still useful fuzzer against a kernel. Most importantly: the same machinery can be reused to fuzz other parts of Linux subsystems - from file systems to bpf verifier.
I also learned a hard lesson: tuning fuzzers is a full time job. Proper fuzzing is definitely not as simple as starting it up and idly waiting for crashes. There is always something to improve, tune, and re-implement. A quote at the beginning of the mentioned presentation by Mateusz Jurczyk resonated with me:
"Fuzzing is easy to learn but hard to master."
Happy bug hunting!